Wood crafting offers teenagers a screen-free creative outlet that builds tangible maker skills, spatial awareness, and fine-motor precision. Working with wood bridges the gap between functional design and personal aesthetic, allowing beginners to turn raw timber, scrap boards, and birch plywood into bespoke bedroom accents or thoughtful handmade gifts.
These ten accessible, budget-friendly wood craft projects require minimal specialized machinery and focus on hand tools, safe assembly, and customizable finishing techniques.

1. Minimalist Wood Slice Photo Holders
Natural wood rounds bring organic warmth to a desk or shelf while serving as functional photo displays. Using pre-cut birch or pine tree slices preserves the rustic live edge with zero heavy sawing required.
- Tools & Materials: 3–4 inch wood slices, hand saw or rotary tool, fine-grit sandpaper, clear wood wax or acrylic sealer.
- Technique: Cut a clean, 1/4-inch deep channel straight across the top diameter of the wood slice using a craft hand saw. Sand the slice smooth along the face while keeping the bark intact. Finish with matte wax, then slip polaroids, postcards, or art prints directly into the groove.

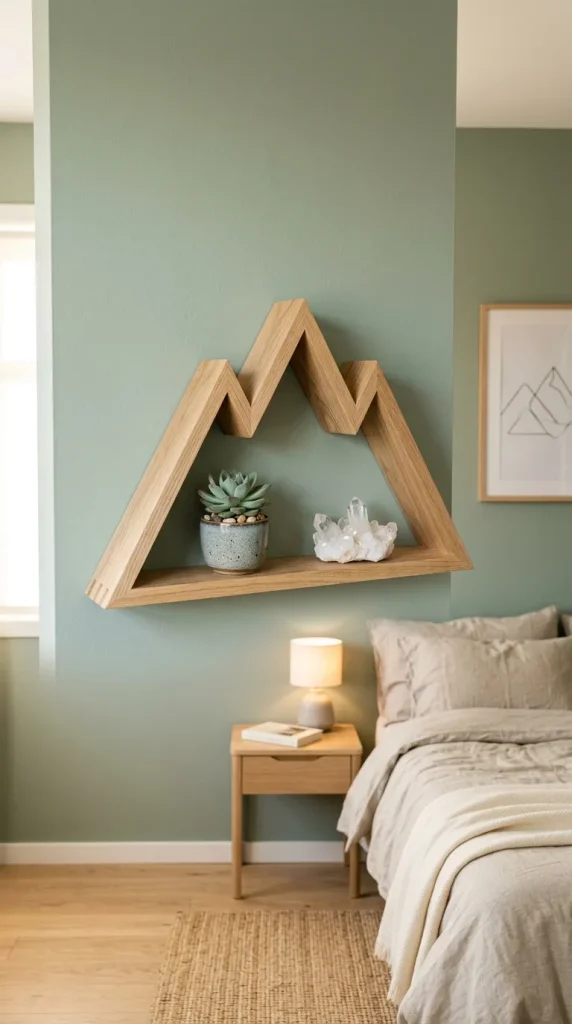
2. Geometric Mountain Wall Shelf
Triangular and mountain-themed floating shelves combine clean Scandinavian lines with sturdy construction, perfect for displaying crystals, mini plants, or small collectibles.
- Tools & Materials: 1×4 pine boards, miter box with hand saw, wood glue, finishing brad nails, orbital sander, wood stain.
- Technique: Cut pine planks at precise 60-degree and 30-degree angles to form interconnected triangles. Join the edges using wood glue reinforced with small brad nails along the joints. Sand every seam flush, apply a two-tone stain to highlight the geometric peaks, and add sawtooth hangers to the back.
3. Slotted Wooden Phone & Tablet Stand
A compact desktop amplifier and charging dock made from layered or slotted scrap wood eliminates tabletop cord clutter with zero mechanical parts.
- Tools & Materials: 3/4-inch hardwood scraps (oak, walnut, or pine), coping saw or jigsaw, chisel, wood glue, mineral oil.
- Technique: Cut two interlocking wooden pieces with matching friction-fit slots so the stand packs flat for travel. Alternatively, laminate three wood blocks together, carving a angled viewing groove in the front and a recessed speaker channel at the base to naturally amplify audio.

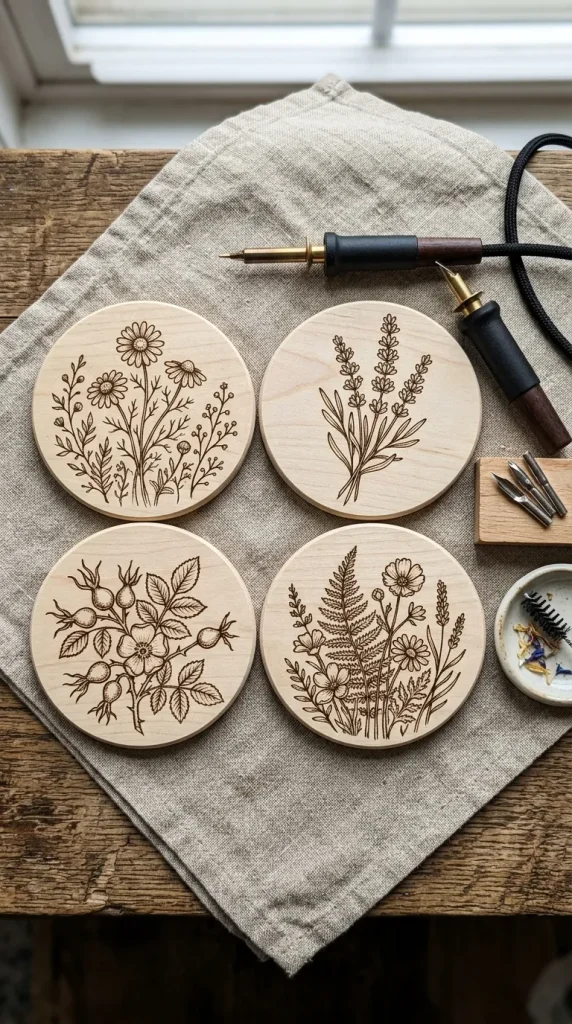
4. Pyrography Botanical Coasters
Wood burning (pyrography) allows teens to illustrate detailed botanical, astronomical, or abstract line art permanently into wood surfaces.
- Tools & Materials: Basswood coaster blanks, beginner pyrography pen with assorted tips, graphite transfer paper, heat-resistant surface, polyurethane sealant.
- Technique: Trace custom line art onto sanded basswood blanks using graphite transfer paper. Use a fine-point burning tip at medium heat to burn steady, uniform linework into the grain. Seal with two coats of waterproof polyurethane to protect against moisture rings.
5. Mid-Century Modern Dowel Plant Stand
Elevating indoor succulents and house plants adds dimension to bedroom greenery. This project teaches cross-lap joinery on a beginner scale.
- Tools & Materials: 1-inch square wood dowels, 3/4-inch round dowels, wood glue, hand saw, wood stain or pastel paint.
- Technique: Create an “H” frame base using two square dowels joined at the center with a half-lap joint. Drill precise holes into the vertical leg dowels to securely seat the crossbar with wood glue. Sand thoroughly and apply a walnut stain or color-blocked pastel paint coat.

6. Framed Wooden Bead & Board Jewelry Organizer
A wall-mounted hanging rack solves tangled necklaces and misplaced rings while turning accessories into wall decor.
- Tools & Materials: 1×6 craft board, assorted wooden beads, brass cup hooks, leather cord, acrylic paint, mounting hardware.
- Technique: Paint geometric color blocks across a smoothly sanded craft board. Screw brass cup hooks along the bottom edge for necklaces. Drill holes along the top to thread a leather strap adorned with hand-painted wooden beads for a bohemian wall hanger.

7. Modern Wooden Desk Caddy & Organizer
Custom desk trays keep stationery, pens, and charging cables neatly segmented.
- Tools & Materials: 1/4-inch birch plywood, hobby saw, wood glue, clamps, painter’s tape, clear lacquer.
- Technique: Measure and cut a baseboard with modular perimeter walls and interior divider strips. Dry-fit the pieces before applying wood glue along all interior joints. Clamp securely using painter’s tape while drying, then finish with a durable satin clear coat.

8. Hand-Carved Wooden Butter & Jam Spreader
Whittling small kitchen utensils provides an introduction to wood grain direction, knife safety, and hand carving techniques.
- Tools & Materials: Basswood or cherry carving blank, safety thumb guard, whittling knife, progressive sandpaper (80 to 400 grit), food-safe mineral oil or beeswax.
- Technique: Sketch a flat spreader blade and ergonomic handle onto a small hardwood blank. Work slowly with push and stop cuts, carving away from the body to refine the profile. Sand through fine grits until completely smooth, then saturate the wood with food-grade mineral oil.

9. String Art Wooden Wall Plaque
Combining wood finishing with string art patterns produces bold, textured 3D typography or silhouettes.
- Tools & Materials: Reclaimed pallet wood or pine plaque, linoleum/wire nails, hammer, embroidery floss, printed design template.
- Technique: Sand and stain a wooden board with dark walnut or driftwood gray stain. Tape a paper template (such as an initial, constellation, or animal silhouette) onto the board. Hammer wire nails evenly around the outline at 1/2-inch intervals. Tear away the paper and weave embroidery floss across the nail grid in random, crisscrossing layers.

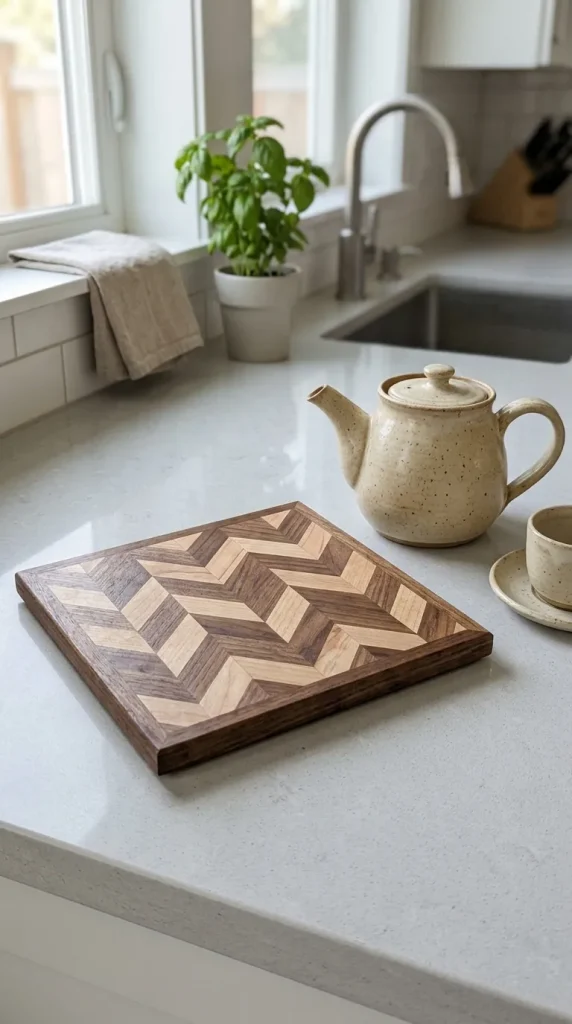
10. Mosaic Wood Scrap Trivet
Assembling geometric end-grain and edge-grain scrap cutoffs into kitchen trivets prevents scrap wood from going to waste.
- Tools & Materials: Assorted hardwood scrap strips (maple, walnut, cherry), miter saw/hand saw, waterproof wood glue, clamps, felt pads.
- Technique: Cut wood scraps into uniform geometric squares and diamonds. Arrange the contrasting wood species into a herringbone or chevron pattern. Glue the seams under clamp pressure, sand the top surface dead-flat, apply butcher block oil, and adhere felt pads to the underside.